
Master the Art: Paint Kitchen Cabinets like a Pro in 9 Steps

Looking to revitalize your kitchen without breaking the bank? Exploring the art of painting kitchen cabinets could be your answer. While a full-scale kitchen renovation might strain your budget, cabinet painting provides a cost-effective alternative that can refresh and rejuvenate your space. Embarking on the journey of painting kitchen cabinets is a hands-on, time-intensive DIY project that many enthusiastic homeowners can confidently undertake.
The advantages are twofold: it’s a budget-friendly option (especially when compared to the expense of new cabinets), delivering a complete transformation that can instill a sense of pride in your DIY accomplishments. Given that the kitchen serves as the central hub of the home, maintaining its visual appeal and crafting a space where family and friends feel inclined to gather can yield significant returns on your investment. Before diving in, here’s what you need to know.
Why consider giving your kitchen cabinets a fresh look?
Just as a new coat of paint can transform a room or revive an old bookshelf, your kitchen cabinets can undergo a similar rejuvenation. Trends in color evolve, and the once-beloved dark wood in your kitchen might not capture the light, airy atmosphere you desire from contemporary designs you encounter daily on Pinterest or Instagram. Opting to paint your cabinets, a project costing a few hundred dollars rather than the thousands needed for replacement becomes an attractive solution for those not yet ready to embark on a complete kitchen remodel.

Can I take on the task of painting kitchen cabinets myself?
While painting kitchen cabinets isn’t overly challenging, adhering to the entire process is crucial for satisfactory results. This isn’t the moment for shortcuts. While having a helping hand can be beneficial, it’s not a necessity. If you’re enthusiastic and adept with a paintbrush, turning this into a weekend DIY project is feasible—depending on your kitchen’s size and your pace.
The more cabinets you have, the more time-intensive the job becomes. Adequate space is essential for laying out cabinet doors during sanding, priming, and painting, with drying intervals between coats. Patience is key for achieving a flawless finish.
Can I apply new paint over my kitchen cabinets?
As opera singer Beverly Sills wisely noted, “There are no shortcuts to any place worth going.” This holds for painting cabinets with an existing paint coating. Although it might seem like a time-saving solution, it can introduce challenges to achieving the desired aesthetic. Sarah Barnard, a LEED- and WELL AP–certified interior designer, warns that the original color may impact the new one, even with multiple coats. This applies even if the original color is white or neutral, as additional layers can disrupt the coating, pose adhesion challenges, and increase the risk of future chipping. Moe Soloff, a kitchen specialist at Fabuwood, concurs, pointing out potential issues like thickness, alignment, and functionality due to multiple layers.
What type of paint is suitable for kitchen cabinets?
Choosing the right paint is crucial for cabinet painting. Stephanie Calderon, owner and principal designer at Stephanie Calderon Interiors, emphasizes functionality first and aesthetic preferences second. She favors oil-based enamel paint for its smooth application and high stain resistance. Calderon suggests that oil-based paint can achieve various design aesthetics. For a decorative touch, acrylic enamel paint offers a slick finish, while chalk paint provides a distressed look.
Barnard emphasizes the importance of durability for kitchen cabinets, being high-touch surfaces. While glossy paints are resilient, she notes that durable options come in various finishes. Opting for low- or zero-VOC paints, especially in the kitchen, is beneficial, given the frequent contact with painted surfaces during food preparation.
Several brands, including Benjamin Moore and Behr, offer specialized formulations for doors, cabinetry, and trim, ensuring easy application and a self-leveling feature for a smooth finish. Whether enamel-based or latex, high-quality paint stands up well to daily wear, and tear, and routine kitchen cleaning. A gloss or semi-gloss finish is recommended for better resistance to cleaning and scratches.
Regardless of your chosen approach to painting your kitchen cabinets, don’t overlook the importance of testing paint samples. According to Barnard, it’s crucial to observe how the color changes throughout the day and interacts with the kitchen’s lighting and existing materials to ensure the desired look and feel.
How do I make the right choice for my paint color?
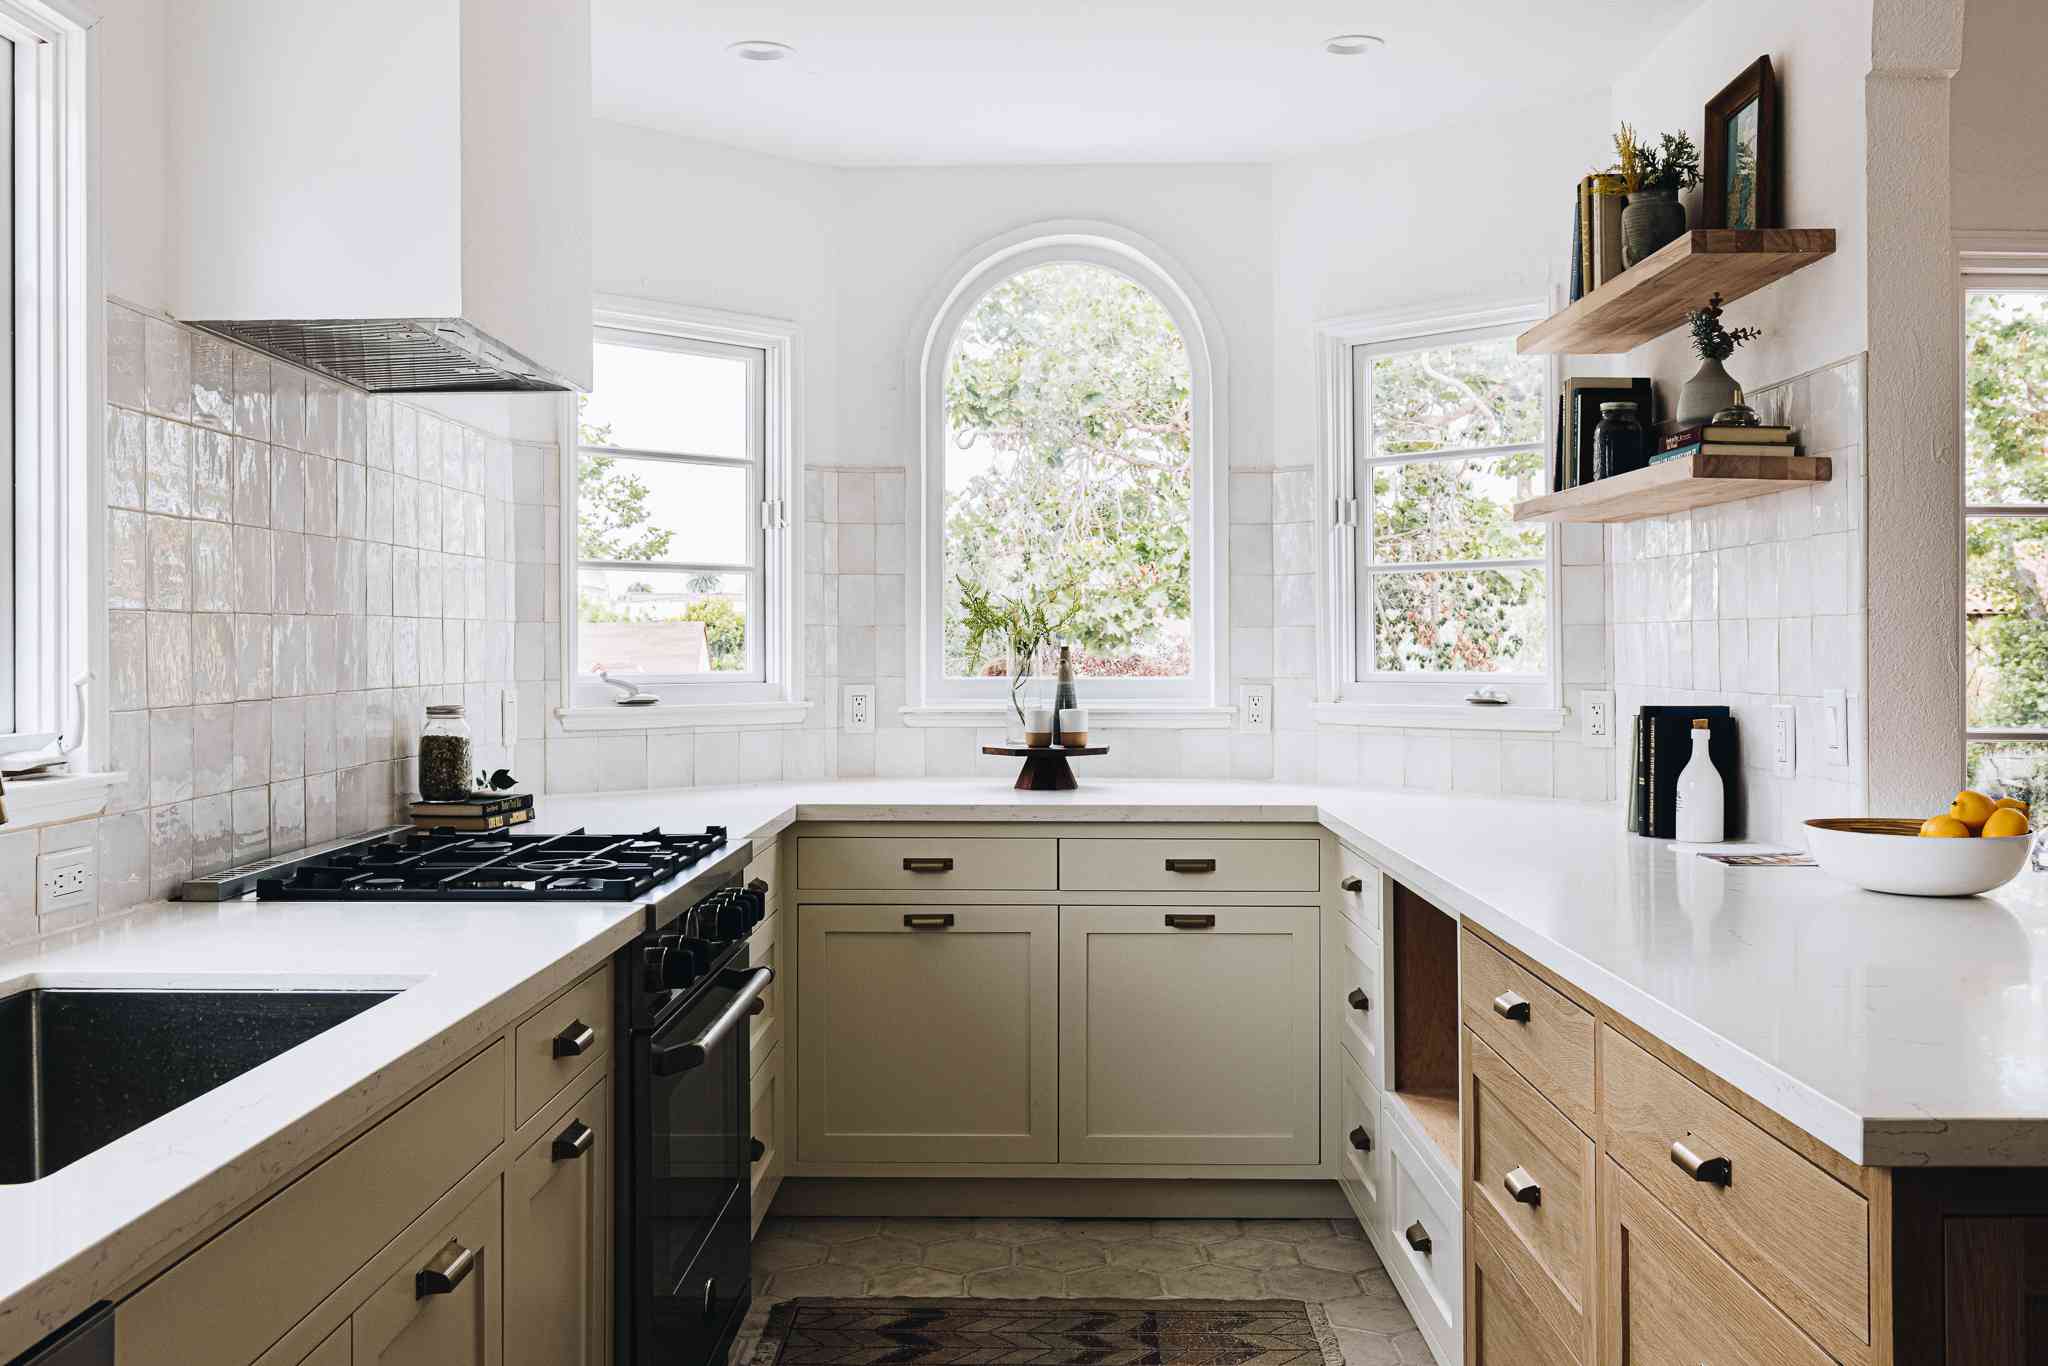
When investing time and effort into painting your kitchen cabinets, selecting a color you genuinely love is paramount. Green, spanning various shades, has gained popularity in kitchens, offering options from jewel tones to earthy hues. Classic white remains a timeless choice, complementing your existing kitchen elements, though it may be prone to showing stains and grime. For a bold and sophisticated look, consider the sleekness of black in your kitchen.
An effective strategy for choosing a cabinet color is to draw inspiration from your kitchen’s existing elements. Consider elements you already adore, such as hardware or fixed appliances, to create a cohesive color palette. Ensure that your cabinet color complements your countertops and enhances the visual appeal of your backsplash. Don’t hesitate to experiment, as you can always change your mind and repaint.
How much space should I allocate for this project?
Undertaking a cabinet painting project requires sufficient space. You’ll need a sizable area to lay cabinet doors flat, preventing drips during the drying process between the first and second coats. The quantity of doors dictates the space needed, unless you plan to work in batches. If you intend to work outdoors, borrowing sawhorses and using your front yard is an option, but be mindful of the weather—rainstorms and freshly painted cabinets don’t mix. Indoor painting (in a garage or covered patio) is ideal, and using small plastic tripods can help. Ensure proper ventilation by using fans and opening windows.
Feeling ready for the kitchen cabinet painting project? Fantastic! Here’s a detailed guide on how to paint your kitchen cabinets, complete with straightforward, step-by-step instructions and valuable tips from Rick Watson, the Vice President of Product Innovation at Sherwin-Williams.
Is sanding necessary before painting cabinets?
Skipping the time-consuming sanding step is a guaranteed path to a messy end result. According to Calderon and other experts, sanding cabinets before painting is a crucial aspect of the DIY cabinet painting process. Sanding creates a rough surface that allows the paint to adhere, removes previous paint sheens, and addresses imperfections, resulting in the smoothest finish possible. If the cabinets have been previously painted, it’s essential not only to sand off the old paint but to sand again to smooth out the wood, preparing the surface for a new paint layer. As Barnard emphasizes, priming the cabinets after sanding is another vital step to enhance evenness and color.
And yes, sanding your kitchen cabinets twice (first to remove old paint, then to smooth out the wood) is recommended, so brace yourself for an arm workout!
What’s the best approach for painting kitchen cabinets?
For painting kitchen cabinets, using both a roller and brush is typically recommended. Soloff suggests that rollers are excellent for larger flat areas, ensuring a smooth, streak-free finish and potentially expediting the project. However, Barnard advises DIYers to be aware that rolling can create a slightly bubbly texture, recommending the use of a smaller, high-quality roller to minimize unwanted textures. Brushes, according to Soloff, are perfect for detailed work, edges, and corners, especially reaching into crevices like the inside border on a classic Shaker door design. Additionally, Barnard notes that some may prefer the brushed-on color look for a slightly more antique appearance when painting kitchen cabinets. In summary, using both tools ensures an even coat, attention to detail, and a professional-looking result.
To embark on painting kitchen cabinets, gather the following supplies:
– Painter’s tape
– Trisodium phosphate (TSP) heavy-duty degreaser
– Wood filler
– 60-grit sandpaper (coarse)
– 360-grit sandpaper (fine)
– Sanding block or an orbital sander
– All-surface primer
– Durable cabinet paint
– A paintbrush
– Four-inch foam roller
– Drop cloths
Step 1: Assemble Your Painting Arsenal
Rick Watson cautions against opting for the cheapest brushes and rollers, emphasizing the impact on the final result. Taking the time to consult with a local paint store professional ensures the selection of quality supplies, avoiding the inconvenience of dealing with brush bristles or unsightly brushstrokes during the painting process. Investing in better supplies not only ensures a superior outcome but also extends their lifespan for future DIY projects. Setting up a proper painting area is equally essential and pays off during cleanup. A drop cloth proves to be a valuable tool for repainting cabinets.
Step 2: Detach Cabinet Doors, Drawer Fronts, and Hardware
Efficiency in painting every surface is enhanced by removing all cabinet doors and drawer fronts from their hinges before starting. To simplify reassembly, label each cabinet and its corresponding door with matching numbers. Removing all cabinet hardware, even if you plan to replace it, ensures a clean starting point. Thorough prep and planning minimize frustration throughout the project. Leave the cabinet boxes in place, using painter’s tape where they meet the wall. Cabinet boxes, typically devoid of embellishments, are easier to prep and paint while on the wall. While it’s essential to paint visible areas from the outside, the decision to apply a fresh coat of paint on the inside is at your discretion.
Step 3: Ensure Cabinetry is Spotless
To avoid becoming part of the 80% of kitchen painting complaints stemming from insufficient surface preparation, heed Watson’s advice. Take the time to degrease months, or possibly years, of cooking splatters and kitchen grease. Clean cabinet doors thoroughly as paint adheres better to a clean surface. Don’t attempt to outsmart the system by relying solely on sanding to remove grime—sandpaper may not always be effective, and you risk pushing dirt into the wood. While some opt for a deglosser, a multipurpose cleaning agent like TSP degreaser works just as effectively to banish oil, debris, and grease.
Step 4: Repair Scuffs and Nicks with Wood Filler
Inspect your cabinets for imperfections such as deep scuffs, nicks, holes, gouges, or scratches. Apply wood filler to fill the openings, spreading the excess with a putty knife. Allow it to dry according to the instructions on the wood filler tube before proceeding. This step can significantly ease the repainting process, transforming the original cabinetry into what looks like new cabinets.
Step 5: Sand the Cabinet Doors
“Sanding scuffs up the surface of the cabinet and opens up the pores of the wood for primer to sink in and create adhesion,” advises Watson. If your cabinets only need a light sanding, you can use 60-grit sandpaper or a sanding block by hand. However, if you’re not equipped with arms of steel, consider investing in an orbital sander. You can rent one from a home improvement store or borrow it from a DIY enthusiast friend. Note that the removal of old paint may generate dust or fumes containing lead (if your cabinetry predates 1978). Always wear a sanding mask, even if you believe your cabinet doors are lead-free. Conclude this step by wiping the cabinet surface with a tack cloth to eliminate residual dust.
Step 6: Apply a coat of primer
Consult with your local paint store professional to ensure you have the appropriate primer for your specific job. Zinsser Primer for All Surfaces is a suitable choice for laminate cabinets, and Behr Kitchen, Bath, and Trim Stain-Blocking Primer & Sealer also work well. For wood cabinet doors, consider using Zinsser Bin Advanced Shellac primer. Before beginning the exterior painting process, conduct a patch test in a concealed area of the cabinetry. “If the primer fish-eyes, meaning you see a bubble forming on the surface, that tells you your surface isn’t clean enough,” advises Watson.
Step 7: Optional Re-Sanding of Cabinet Doors
While strictly optional, this step is recommended for those who lean towards perfectionism or desire an exceptionally professional paint job. Consider sanding the dry primer to ensure there is no grit, dust, or stray brush or roller hairs. If you choose this additional step, use fine-grain 360-grit sandpaper. The extra sanding guarantees a smooth finish, saving you potential headaches in the future. Afterward, use a fresh sheet of tack cloth to remove dust, or employ a vacuum attachment to clear dust from cabinet door grooves.
Also Read: Is LeafFilter Worth It? 2023 Review and In-Depth Analysis
Step 8: Begin Painting the Kitchen Cabinets
Wipe down your cleaned, sanded, and primed kitchen cabinets with a damp rag or microfiber cloth to eliminate any settled dust. For painting kitchen cabinets, Watson recommends an interior/exterior paint, such as Backdrop Premium Cabinet & Door, known for its washability and suitability for high-traffic kitchens. The choice of paint finish—whether high gloss, no gloss, flat, or matte—is entirely yours. There’s no necessity for a protective clear coat on top. If you desire extra insurance, consider applying a second coat of your pigmented paint. Using a paint sprayer or spray paint is also a viable option. Allow the paint to dry completely before reinstalling your cabinets, adhering to the manufacturer’s instructions for estimated drying time, typically ranging from one to eight hours.
Step 9: Reassemble Cabinet Doors and Hardware
With the kitchen makeover nearing completion, it’s time to put the finishing touches in place. Once the cabinet doors and drawers have thoroughly dried, reattach them to the cabinet frames. The earlier labeling will now prove invaluable, ensuring a smooth reassembly process. Take this opportunity to reinstall knobs and other hardware, and without a doubt, the kitchen’s refreshed appearance will leave a lasting impression.
Also Read: Dive into Kylie Jenner’s Lavish $80M Real Estate Realm

